Action cams from the likes of GoPro, Garmin and many other brands make it super easy to capture cool footage of your rides. With a host of mounts and accessories, getting interesting perspectives and angles is pretty simple too. If you’ve been treated (or have treated yourself) to a new camera this Christmas, here are some tips for getting the most out of it when you’re mountain biking.
Experiment with Settings/Modes
Don’t worry about getting a perfect shot right out of the gate. 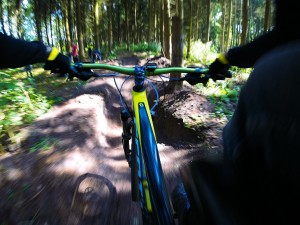 When you first get your action cam, play around with the different settings and modes on offer. There are probably quite a few! These include time-lapse, slo-mo, regular video and photos+video modes. These all give a different effect and result. Think about what sort of riding you do and how best to capture it.
For instance, let’s say you’re often hitting jumps. Shooting at a high frame rate like 120 or 240 fps will allow you to really slow down your footage in post-production, but retain a smooth image. Try out all of the different modes over a few rides, and see which ones suit your riding style and personal taste.
Try Out Different Positions
As mentioned, the market for action camera accessories is huge and there are heaps of straps, mounts and brackets out there. These allow you to mount your camera on your chest, bars, seat post or just about anywhere else you can think of. Each position gives a unique viewpoint a new perspective, other than the standard rider POV.
Try putting your camera into its wide-angle setting and mounting it in interesting positions like the bike’s seat stays, suspension forks or on your chest. This will help make your footage different to what’s already out there. It can also help you to analyse your riding and to look for areas for improvement, such as line choice and body position.
Clean the Lens Regularly
Especially during the winter, a good tip is to try to remember to give the camera’s lens a quick wipe when you stop during a ride. This will stop the lens getting lots of dirt or water on it when you’re riding, which can potentially save your shots and footage. There’s nothing more annoying than riding for hours, eagerly uploading your ride and finding half of it is unusable. It doesn’t take much mud or water to obscure the camera’s view either, so cleaning it regularly will help avoid this issue.
On particularly grim days, consider using mudguards to reduce the amount of spray being thrown up at the camera. These shouldn’t interfere with your shot, but keep the worst of the debris at bay.
Get Commentating
Finally, some of the most interesting mountain bike clips have riders providing a running commentary as they ride. Commentary adds another layer of interest to the footage, as well as some personality too. We’ve all seen POV mountain bike footage done to music or simply with ambient noise
Including commentary (whether this is as you’re riding, or with a microphone afterwards) creates footage that can’t be done by anyone else in quite the same way. You can talk about everything from the trail, the bike you’re riding or just some random musings – it’s all good!
A Question for You
How do you use your action cam to film your rides? Which one do you have? If you have any original mounting positions for your camera that have worked particularly well, do let us know below!

Recent Comments